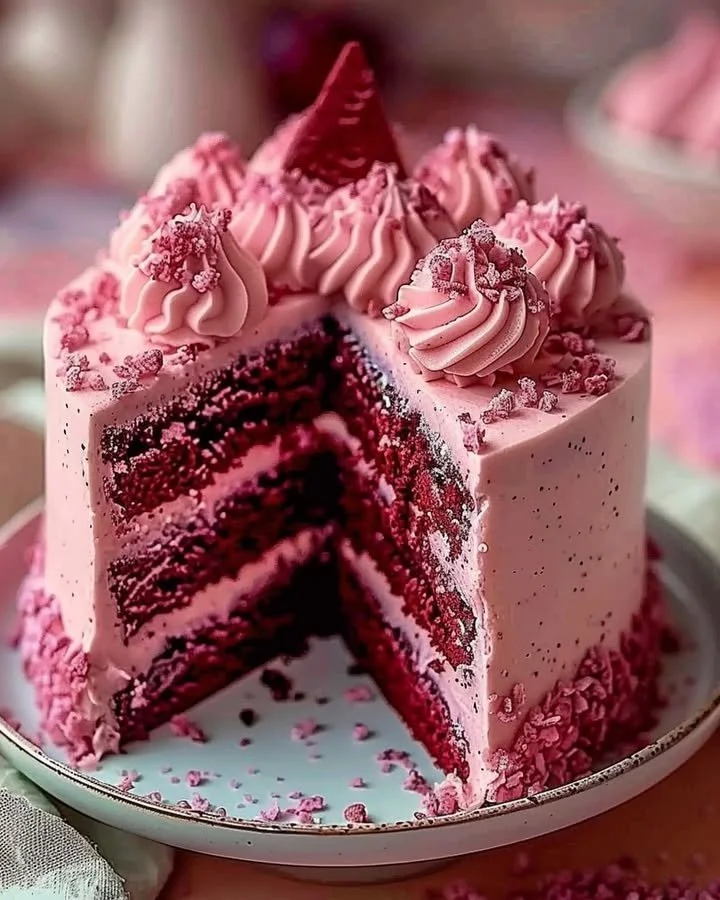
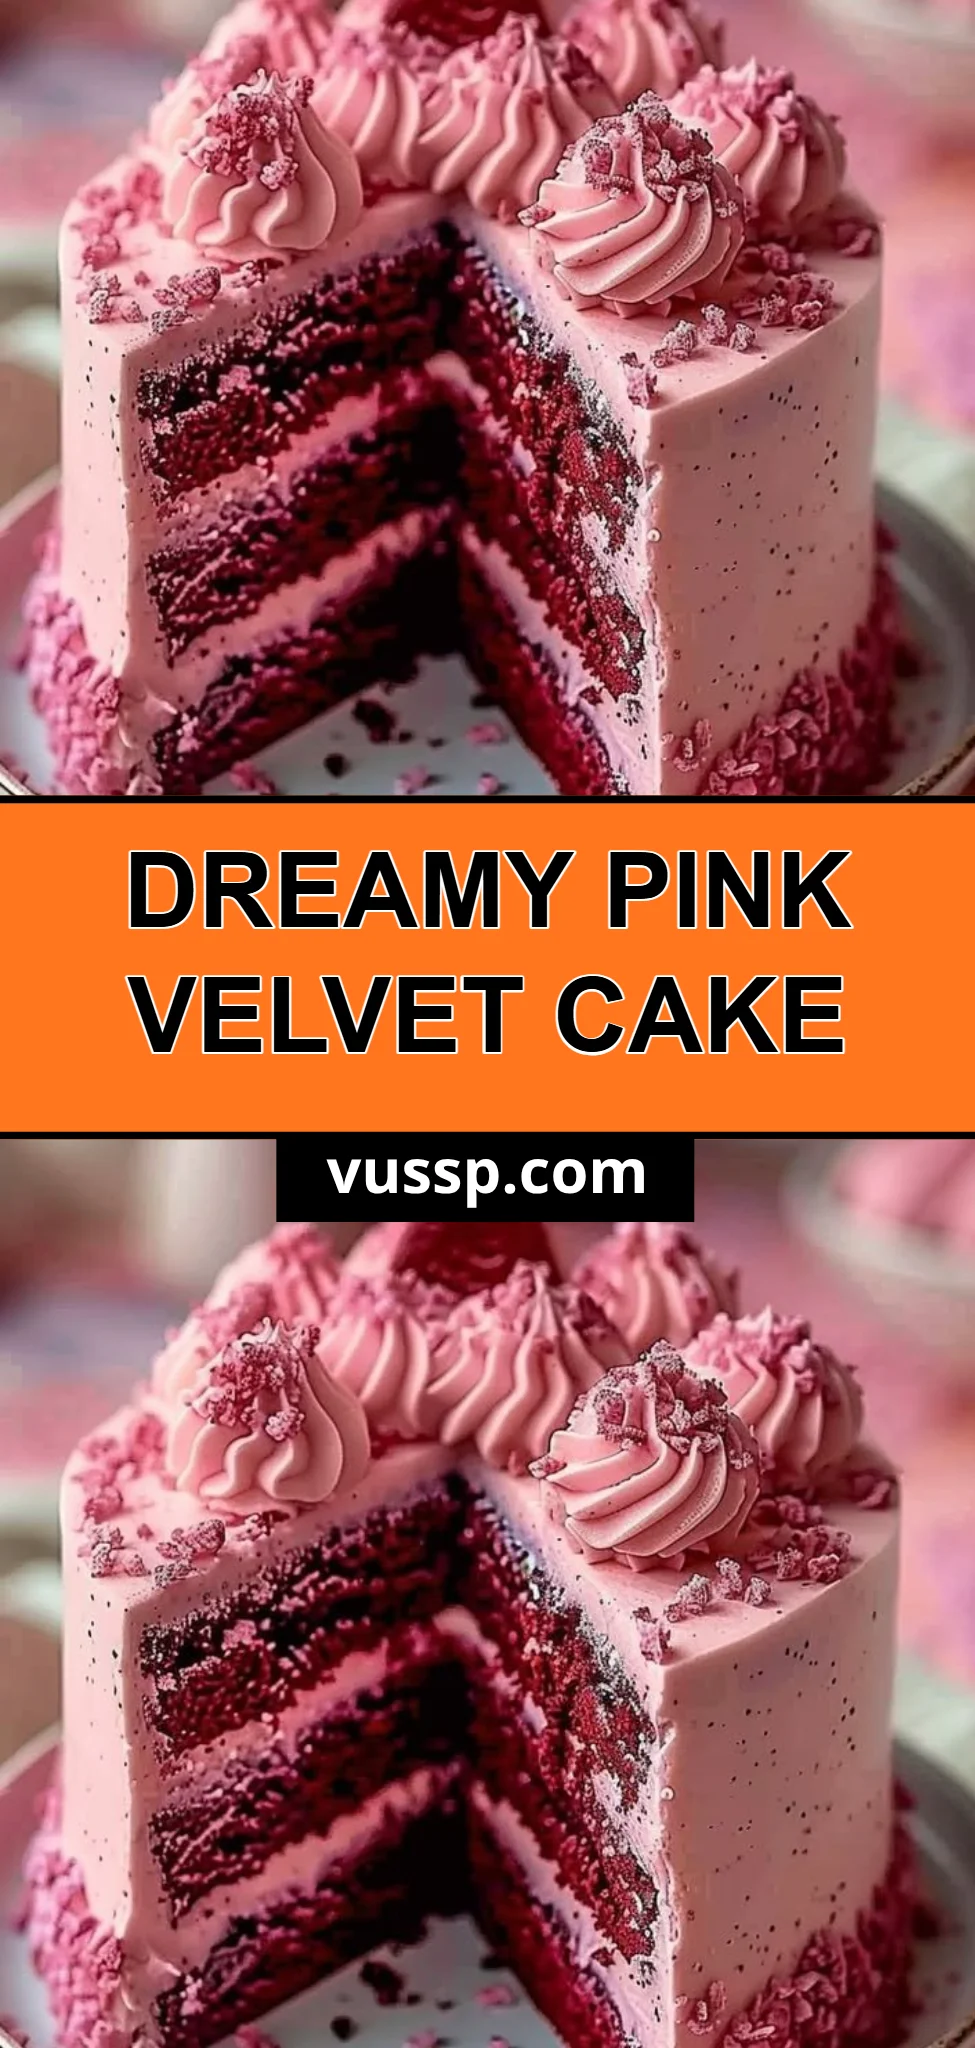
Pink Velvet Dream Cake is a delightful treat that tantalizes the senses with its vibrant color and luscious texture. This cake is not just a feast for the eyes; it is a comforting dessert reminiscent of cherished moments spent with loved ones. With its soft, velvety crumb and creamy frosting, every bite is a reminder of joy and nostalgia. This recipe is easy and perfect for any occasion—birthdays, anniversaries, or simply a sweet afternoon indulgence. Let’s explore this irresistible cake with a step-by-step approach to ensure you achieve the perfect bake every time.
Ingredients
To create the Pink Velvet Dream Cake, gather the following ingredients, which will bring a rich flavor and stunning appearance to your cake:
- 2 1/2 cups all-purpose flour: This forms the base of your cake, creating a light and airy structure.
- 1 1/2 cups granulated sugar: Sweetness is essential for balancing the cake’s flavors, adding a lovely touch of sweetness.
- 1 tsp baking soda: This leavening agent helps your cake rise perfectly, contributing to its fluffy texture.
- 1 tsp salt: A crucial component that enhances the sweetness and balances the flavors.
- 1 tsp cocoa powder: Just a hint will add depth without overpowering the pink hue.
- 1 1/2 cups vegetable oil: This creates a moist and tender crumb, ensuring your cake is buttery soft.
- 1 cup buttermilk: The acidity adds richness and helps in tenderizing the flour, giving you a soft texture.
- 2 large eggs: These provide structure and stability while adding moisture to the mix.
- 2 tbsp red food coloring: The star ingredient that gives this cake its iconic pink velvet appearance.
- 1 tsp white vinegar: To enhance the reaction with baking soda, contributing to the perfect rise.
- 1 tsp vanilla extract: A touch of aromatic sweetness that elevates the flavor profile.
For the frosting that will lovingly envelop your cake:
- 8 oz softened cream cheese: This brings a creamy richness to your frosting.
- 1/2 cup unsalted butter: Ensures a smooth frosting consistency, with a touch of buttery goodness.
- 4 cups powdered sugar: For sweetness and structure, ensuring that your frosting holds its shape.
- 1 tsp vanilla extract (for frosting): To emphasize flavor in every bite.
Step-by-Step Directions
Preheat your oven to 350°F (175°C). Grease and flour two 9-inch round cake pans. This step ensures that your cake will release easily once baked.
In a large mixing bowl, whisk together the flour, sugar, baking soda, salt, and cocoa powder. This mixture will provide the dry components for your cake.
In a separate bowl, whisk together the oil, buttermilk, eggs, food coloring, vinegar, and vanilla extract. This wet mixture is essential for creating that moist, tender crumb.
Gradually add the wet ingredients to the dry ingredients and mix gently until just combined. Be cautious not to over-mix, as that can lead to a denser cake.
Divide the batter evenly between the prepared cake pans. Bake for 25-30 minutes or until a toothpick inserted in the center comes out clean. This ensures your cakes are perfectly done.
Let cakes cool in pans for 10 minutes, then transfer to wire racks to cool completely. This cooling step is crucial before frosting to prevent melting.
In a mixing bowl, beat the cream cheese and butter until smooth. Gradually add powdered sugar and mix until fluffy and creamy.
Frost the top of one cake layer, then place the second layer on top. Frost the top and sides, ensuring an even spread for a beautiful finish.
Decorate as desired, using sprinkles or edible flowers to enhance the visual appeal of your pink velvet masterpiece.
Tips & Tricks
For the best results, consider the following tips:
- Room Temperature Ingredients: Ensure that your eggs and buttermilk are at room temperature for better emulsification.
- Measurement Accuracy: Use a kitchen scale to measure ingredients for precise baking.
- Chill Frosting: If your cream cheese frosting is too soft, chill it for a bit before frosting the cake to help it firm up.
- Layer Stability: When stacking the cake layers, a layer of frosting in between can act as glue and prevent slippage.
Serving Suggestions & Pairings
The Pink Velvet Dream Cake is a showstopper on its own, but it pairs beautifully with various accompaniments:
- Fresh Berries: Serve alongside strawberries or raspberries for a refreshing contrast to the sweetness of the cake.
- Light Teas: Pair it with a cup of chamomile or green tea for a delightful afternoon treat.
- Celebratory Gatherings: This cake is perfect for birthdays, bridal showers, or any festive occasion where a sweet treat is warranted.
Nutritional Information
This cake serves approximately 12 slices. Each slice contains around 320 calories, depending on the size and thickness of your slices. Here’s a brief look at the nutritional breakdown:
- Total Fat: 15g
- Saturated Fat: 4g
- Cholesterol: 50mg
- Sodium: 170mg
- Total Carbohydrates: 45g
- Dietary Fiber: 1g
- Sugars: 30g
- Protein: 3g
While it’s indulgent, moderation is key! Enjoy this delightful dessert as part of a balanced diet.
Storing Tips & Variations
To keep your Pink Velvet Dream Cake fresh:
- Storing: Cover the cake with plastic wrap or keep it in an airtight container. It can last for up to 3 days at room temperature or a week in the refrigerator.
- Freezing: If you’d like to prepare ahead, freeze individual slices. Wrap tightly in plastic wrap followed by foil; consume within 2-3 months for best quality.
- Variations: Consider adding a layer of fruit preserves between the layers for a delightful surprise, or incorporate nuts for texture. You can also tint your frosting with different colors for various occasions.
Conclusion
The Pink Velvet Dream Cake is a mesmerizing dessert that is sure to impress family and friends. Its vibrant hue and velvety texture make it a delightful centerpiece for any gathering. I encourage you to try this recipe and embrace the joy it brings to your table. Share your baking adventures and experiences with this treat, and watch as it becomes a cherished recipe in your home!
FAQs
Can I use regular milk instead of buttermilk?
Yes, you can make buttermilk by adding one tablespoon of vinegar or lemon juice to regular milk and letting it sit for a few minutes.Is it possible to make this cake in advance?
Absolutely! You can bake the cakes a day in advance and store them wrapped in plastic wrap. Frost them just before serving.What if I don’t have red food coloring?
While traditional recipes use red coloring, you can use beet juice or any coloring of your choice that achieves the desired hue.Can I make this recipe gluten-free?
Yes! Substitute the all-purpose flour with a gluten-free flour blend, making sure to add a stabilizer if necessary for texture.How do I fix a sunken cake?
A sunken cake usually results from underbaking or opening the oven door too early. Ensure that your cake is fully baked before removing it. If it does sink, you can cover the top with frosting for a creative fix!
Now, roll up your sleeves, gather your ingredients, and let’s create some sweet memories with this Pink Velvet Dream Cake!